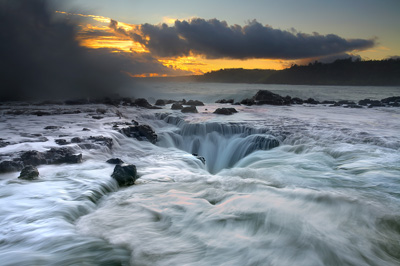
渦巻きに吸い込まれる波
diggで見つけたカウアイ島の写真です。
撮影場所は、カウアイ島のノースショアにある、キラウエア灯台の近くのようです。
[tmkm-amazon]1741041368[/tmkm-amazon]
どうやって撮影したんでしょう?
というより、どういう状態なんでしょうか??
と思っていたら、flickrに撮影方法が書いてありましたので引用。
To get this shot
1. Get up 2 hours before sunrise…. on your vacation.
日の出の2時間前に起きなさい。(休日にね…)
2. Put on your old shoes and shorts that are destined to become stained with red mud.
赤土で汚れるから、汚れてもいい服を着ましょう。
3. Drive to the trail head (Right turn before the Kilauea Lighthouse.)
目的地に向かいます。(キラウエア灯台の右手)
4. Make sure there are decent clouds before committing to the hike down.
大きな雲があるのを確認して降りましょう。
5. Get out your flashlight. I have a wind-up one so no worry about batteries.
懐中電灯を用意しましょう。私にはwind-up(ライト)があるのでバッテリーの心配はありません。
6. Navigate the extremely slippery trail, in the dark, often on all-fours, for 1/2 mile
半マイルの道のりは、暗く、非常に滑りやすいので、時に四つんばいになりながら進みます。
7. Ignore the strange noises in the dense steamy jungle… if you can.
濃密なジャングルの中では奇怪な音がしますが無視して下さい。(できるならだけど…)
8. Watch the surf for at least 20 minutes to determine a safe place to be.
安全なポイントを見つける為に、少なくとも20分は波を観察して下さい。
9. Hand-hold the camera to get the settings right before heading into the water.
水に入る前にしっかりとカメラをセッティングして下さい。
10. Set up the tripod and composition just before the next wave hits.
次の波が来る前に、三脚を固定しましょう。
11. Make the exposure and run!
露出を決めて、いざっ!
12. As you run, make sure to avoid spilling too much blood extracted by the sharp lava rock!
くれぐれも、尖った溶岩でケガをしないように。
以上が撮影方法、といより心構えでした。
ちなみに、種明かしではないですが、同じ場所から撮影されたコチラを見て比較すると、またおもしろいですね。
撮りたい気持ち
最近、撮りたいと思う対象が増えた為、一眼レフをいじり始めました。
なかなか上手にいきませんが、撮りたいという気持ちがあるだけで、充分に楽しんでいます。
[tmkm-amazon]493145089X[/tmkm-amazon]

